Interiorlink
Last updated: May 11, 2024
Interior Optionslink
There are multiple interior variants available in the 2024+ Model 3.
For Instrument Panel:
- AWD/RWD black: Astral Grey Cosmos Textile insert and wing
-
AWD/RWD white: Ultra-white polyurethane (PUR) insert and Light Grey Mineral wing
-
Performance black: Charcoal Ultrasuede insert and Carbon Fiber wing
- Performance white: Ultra-white polyurethane (PUR) insert and Carbon Fiber wing
For Door Trim:
- AWD/RWD black: Astral Grey Cosmos Textile
-
AWD/RWD white: Ultra-white polyurethane (PUR)
-
Performance black: Charcoal Ultrasuede
- Performance white: Ultra-white polyurethane (PUR)
For Center Console:
- All center consoles have the Astral Grey Cosmos Textile.
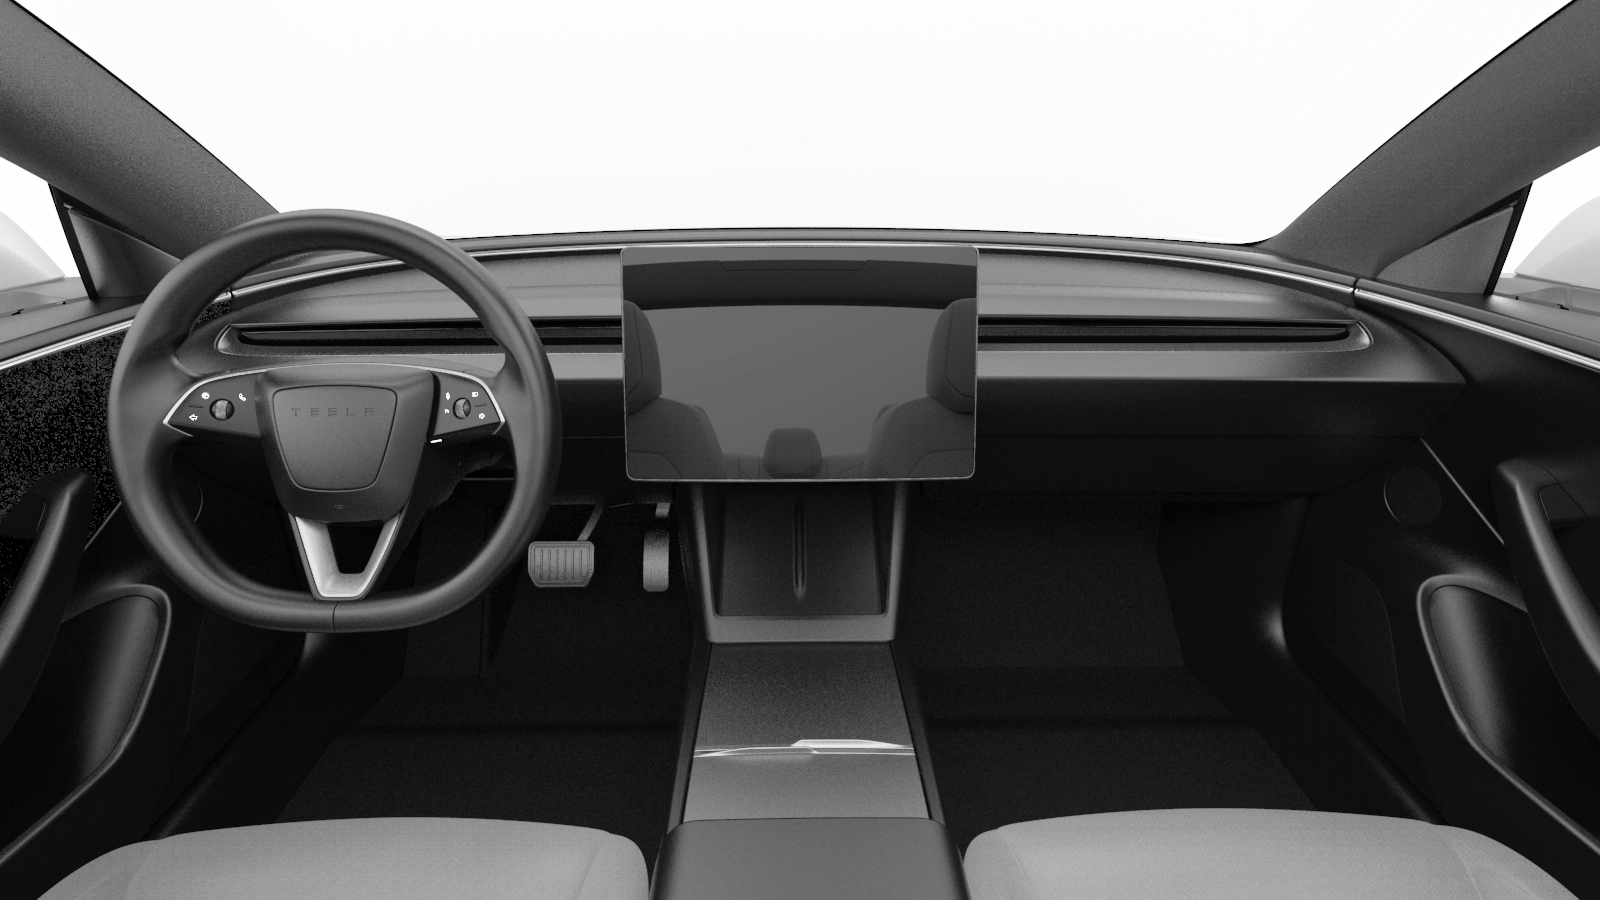 |
|---|
| Interior Overview |
Door Panelslink
Component Descriptionlink
 |
|---|
| 1. Beltline 2. Window switch pack & emergency release 3. Armrest 4. Door reflector 5. Map pocket bin 6. Speaker grille 7. Grab handle 8. Full Range Speaker grille (Premium audio only) 9. Decor (Ambient light inside decor) 10. Tweeter patch 11. Door hook |
| Door Panel, Overview |
The door trim panels hook onto the door at the beltline seal. Each door has a bolt under the grab handle and armrest. The front doors have a third bolt behind the reflector. The door trim allows functionality to control opening and closing the door, control of the window, speakers for audio, grab handle for ease of ingress/egress, a map pocket for storage, and various points of lighting.
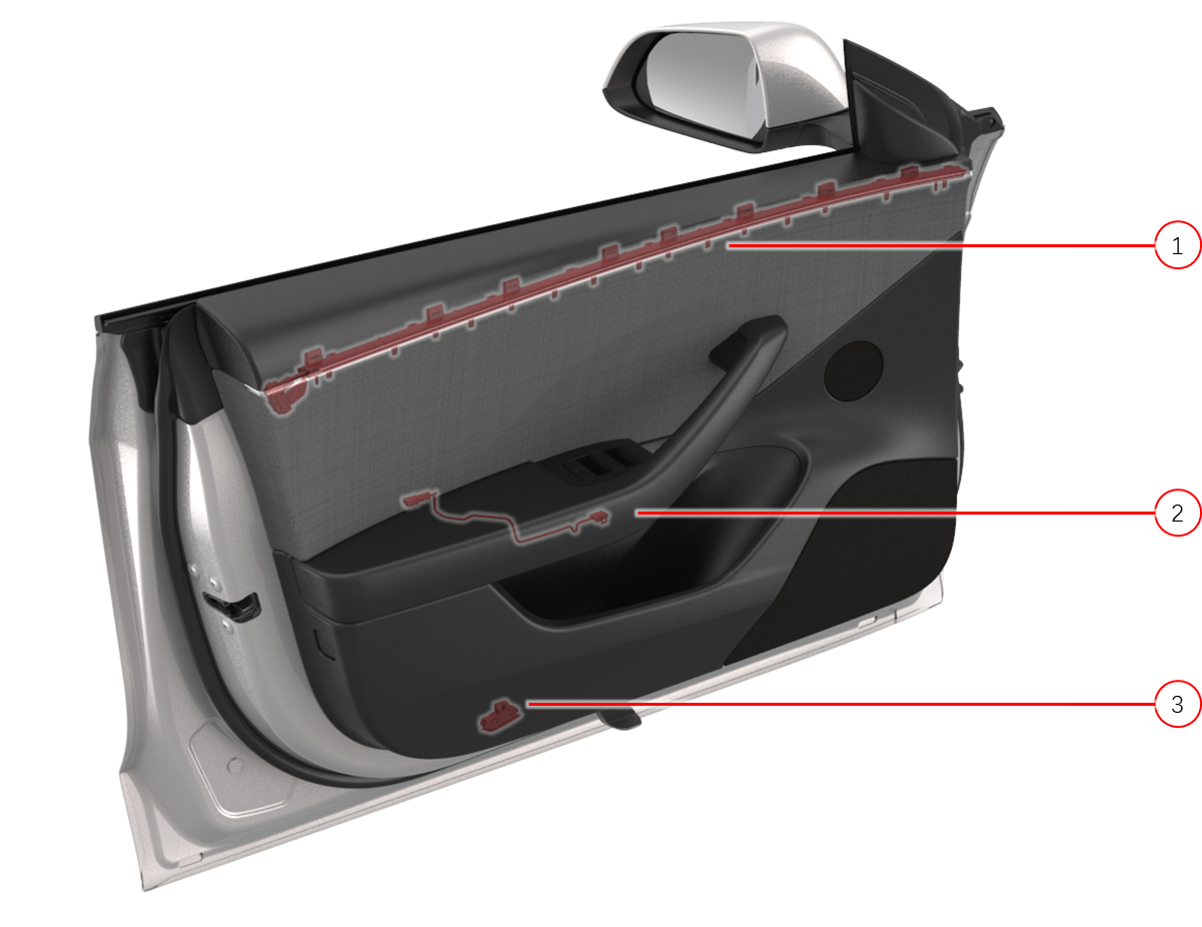
 |
|---|
| 1. Grab handle bolt 2. Armrest bolt 3. Reflector bolt |
| Door Panel Trim - Fastener Locations |
Theory of Operationlink
Door Releaselink
The doors open mechanically or electronically. Both release methods will work if there is low voltage power, however only the mechanical handle will open a door when there is no power. Every door has a button near the top of the grab handle to electronically open the door. Front doors have a mechanical handle in addition to the electronic release button, in case of emergency. The rear latch mechanical release is only accessible through a small service panel. It is used in service to release the latch if there is no low voltage power.
Note
For more information about door release operation, see the Doors Theory of Operation.
Window Switchlink
Every door has a window control button. The driver's door window switch pack controls every window. Each passenger door has a single window switch to raise or lower that individual window. The left front and left rear window switch communicate on the left vehicle controller (VCLEFT), while the right front and the right rear window switch communicates on the right vehicle controller (VCRIGHT).
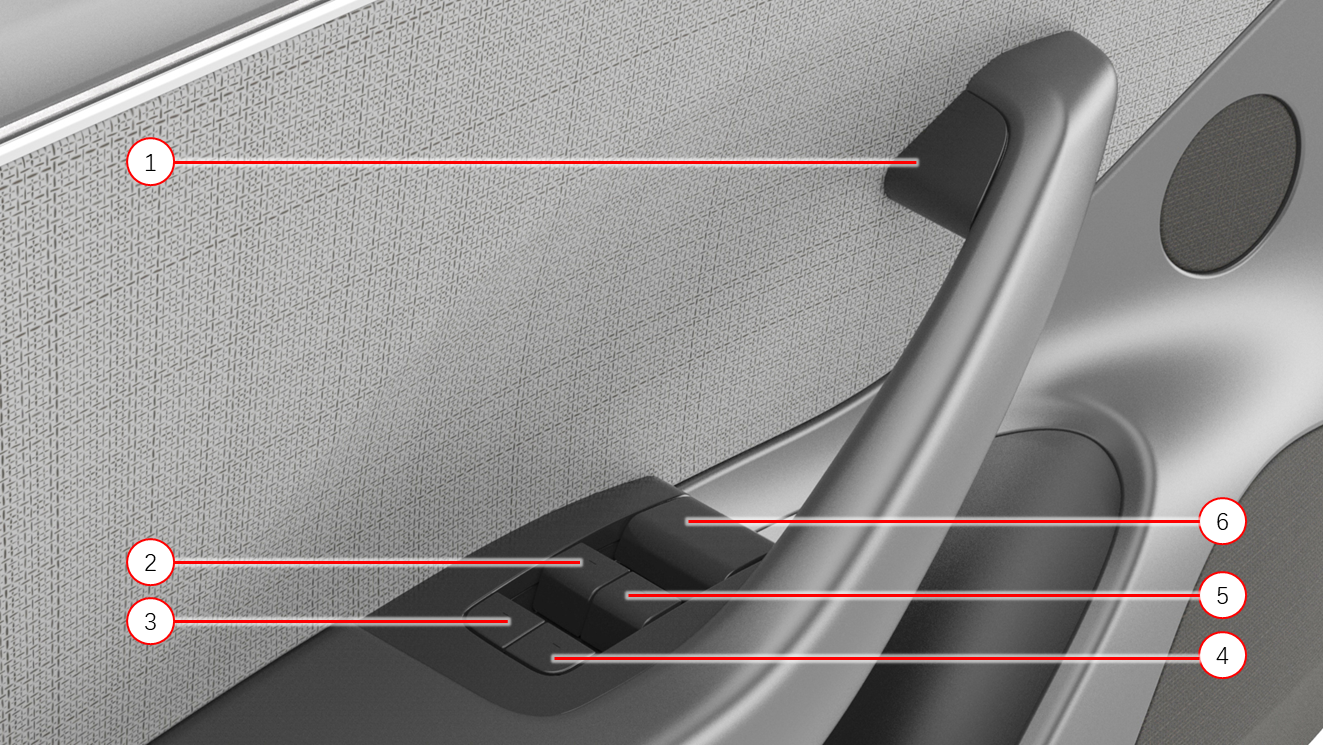 |
|---|
| 1. Electric door release switch 2. Window switch, front left function 3. Window switch, rear left function 4. Window switch, rear right function 5. Window switch, front right function 6. Emergency Door Release Handle (mechanical release lever) |
| Driver's Door Controls |
 |
|---|
| 1. Electric door release switch 2. Emergency door release lever 3. Window switch, front right function |
| Passenger's Door Controls |
 |
|---|
| 1. Electric door release switch 2. Window switch, rear function |
| Rear Doors' Controls |
Door Lightinglink
All doors are equipped with a map pocket ambient light. A puddle light is standard with every Model 3 door, and will turn on when the door is open. The RGB lights located in the door trim communicate on local interconnect network (LIN) to the left or right vehicle controller. This ambient lighting is not constantly on. The customer can select different lighting modes via the UI.
The puddle lamp and side door latch are not connected in serial for all side doors, so in the event the puddle lamp has an open circuit condition, the latch would still report the correct position.
Note
The doors are part of the ambient lighting system. See the Interior Lighting section for more information.
 |
|---|
| 1. Decor ambient lighting 2. Map pocket ambient lighting 3. Puddle lamp |
| Door Lighting |
Carpeting and Floor Matslink
The vehicle has 3 floor mats. The driver's and front passenger's floor mats are separate and the rear floor mat is a wide mat that covers the entire rear passenger footwell. Each mat is cut to fit the shape of the footwell it is designed for, and must be installed with the carpet facing the occupants. A high-retention backing on the mats keep them in position without visible fasteners.
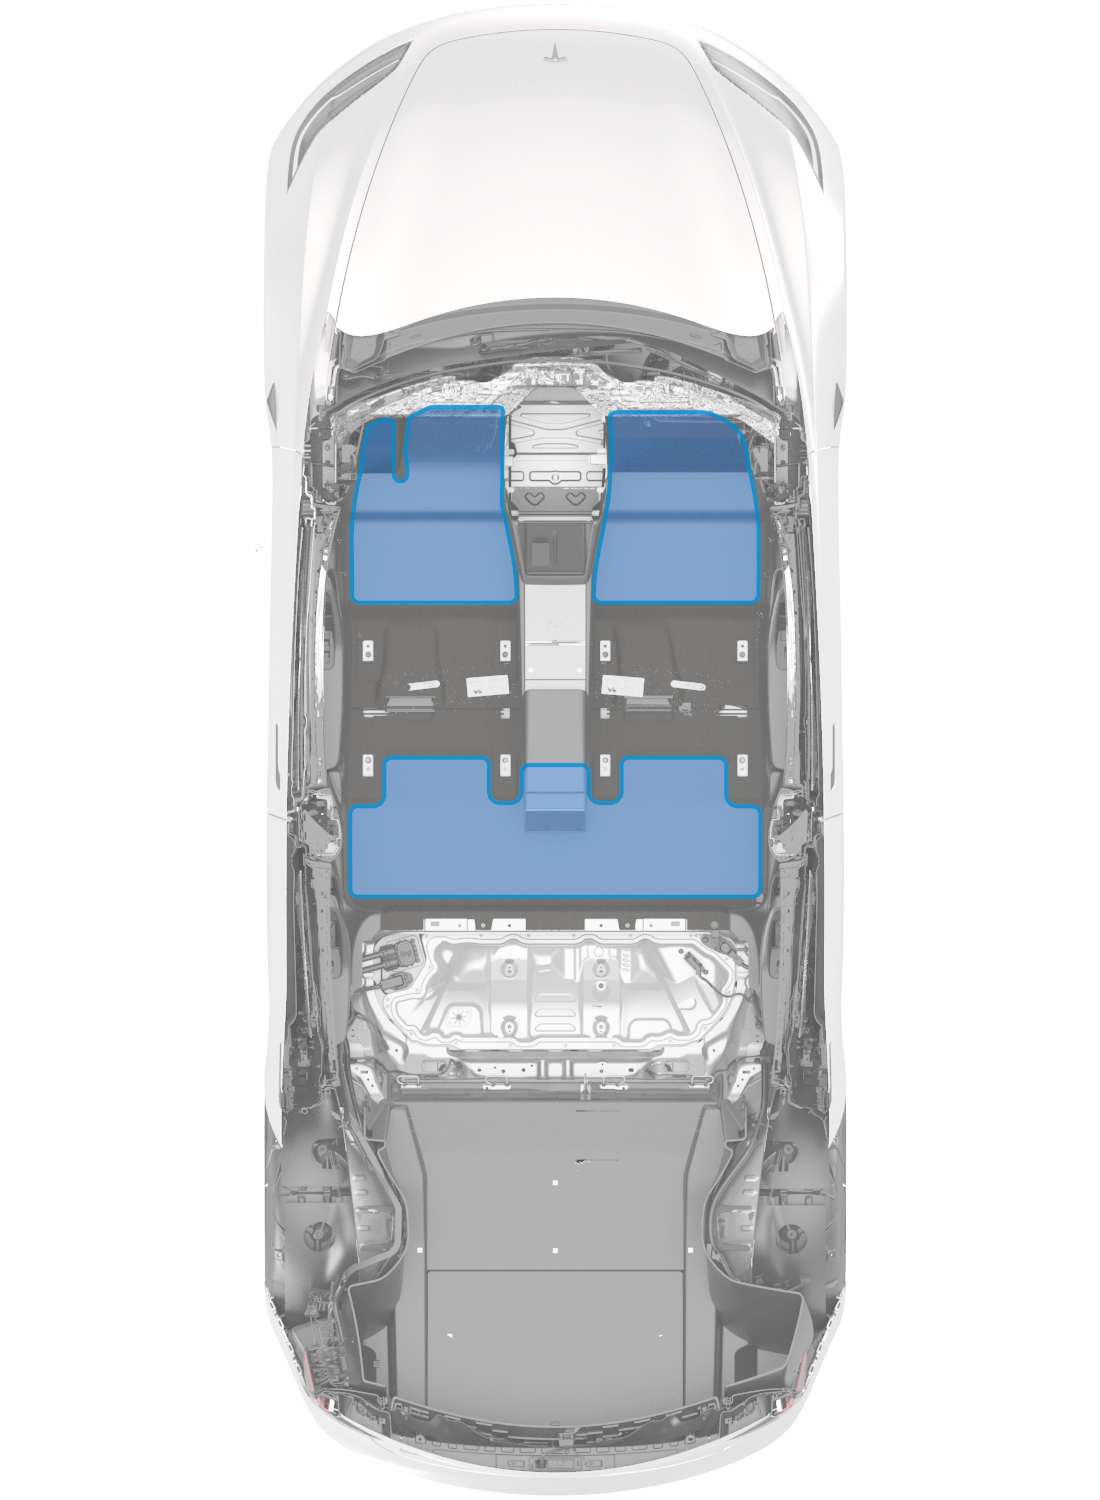 |
|---|
| Floor Mats |
Storagelink
Load Floorlink
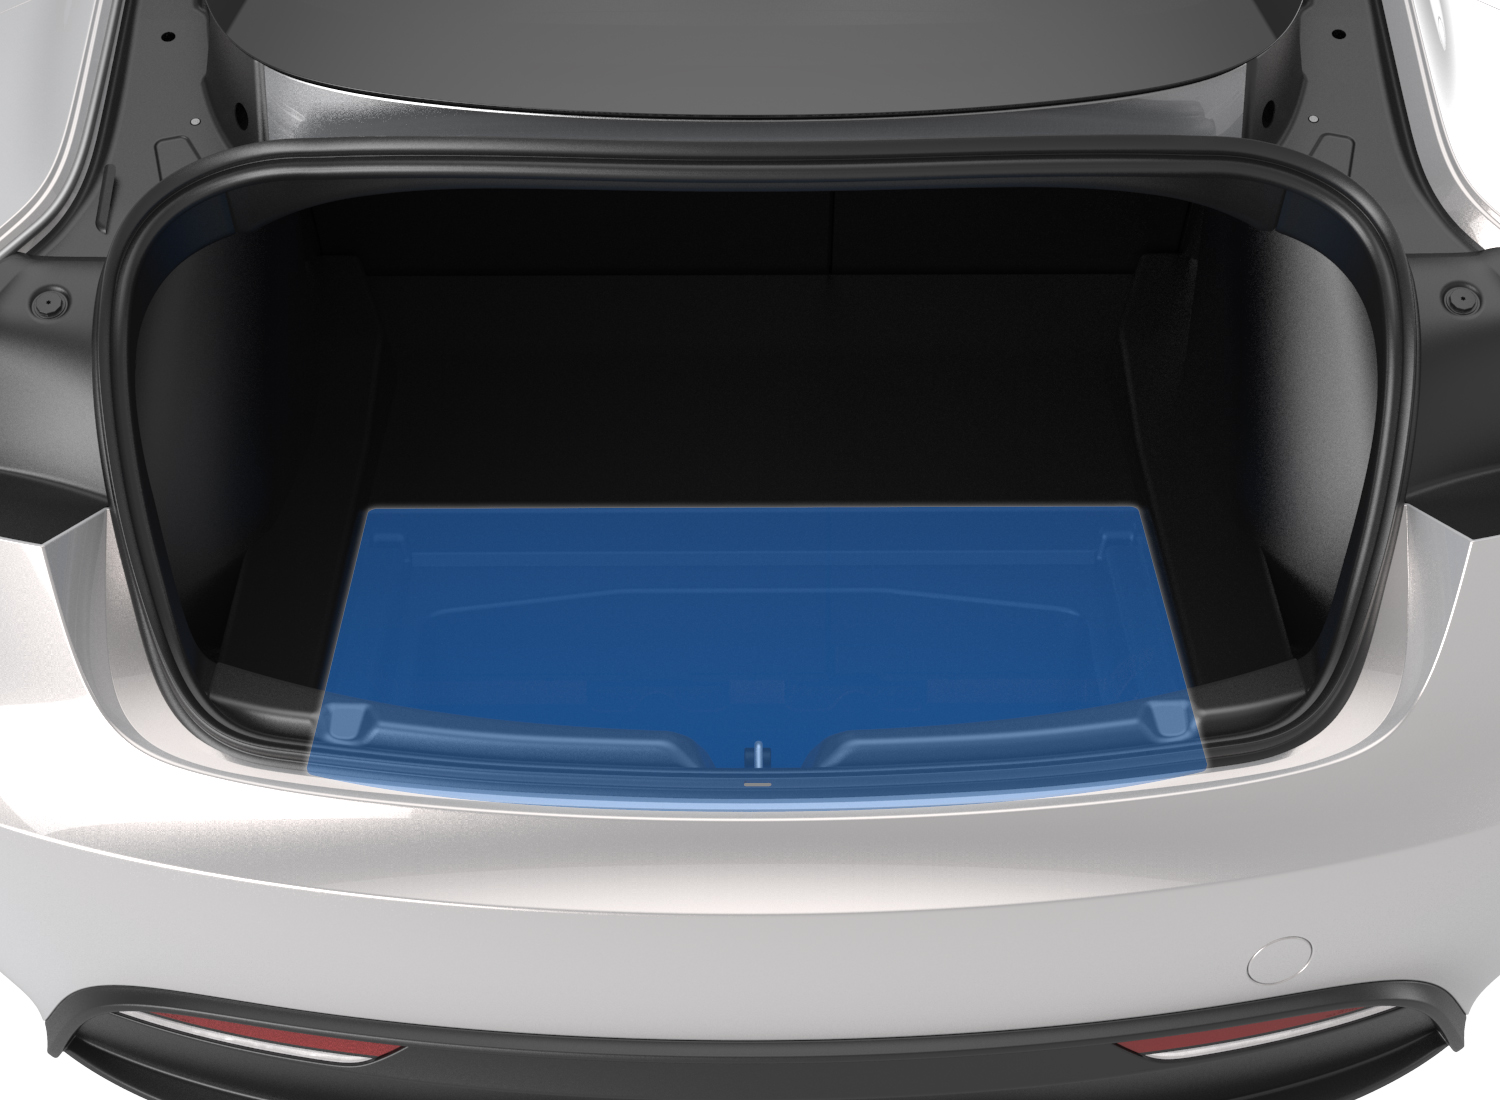
The 2024+ Model 3 has a light-weight load floor wrapped in non-woven carpet and easy lift strap. To access the storage space below, lift the load floor upwards from the strap. The load floor pivots along the rear edge of the trunk trench and it can also be placed at the rear end of the trunk carpet while loading items into the storage. It is recommended to remove all items on the load floor before servicing the vehicle.
 |
|---|
| Load Floor |
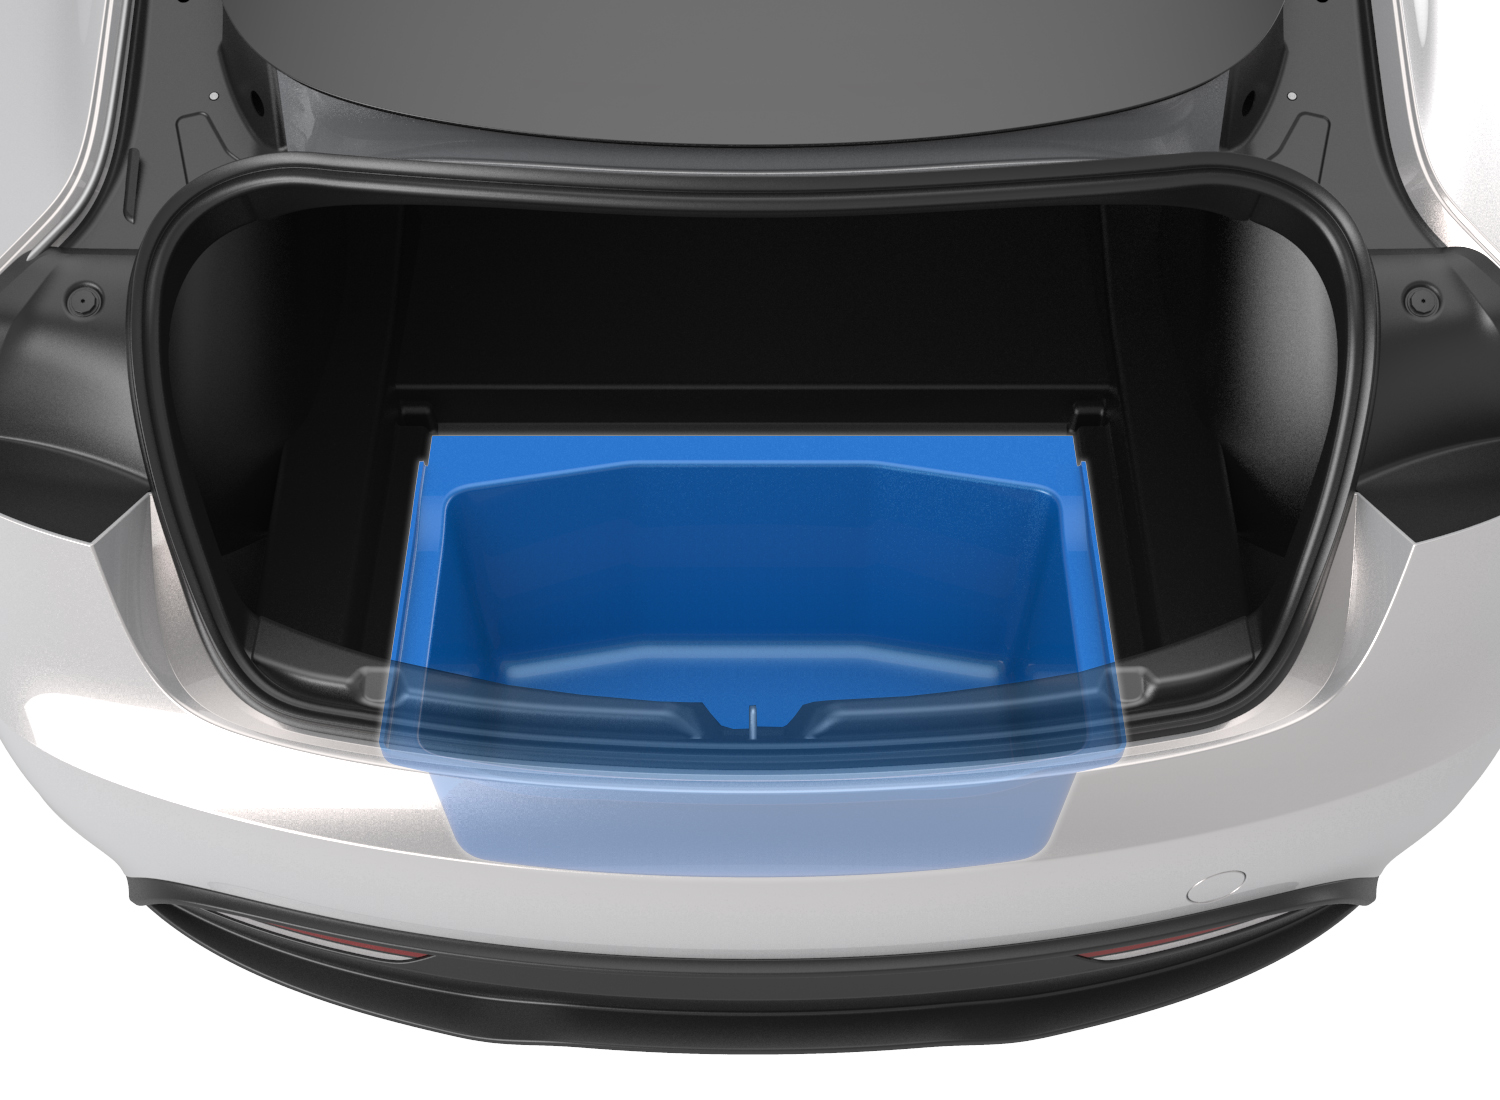
Trunk Storagelink
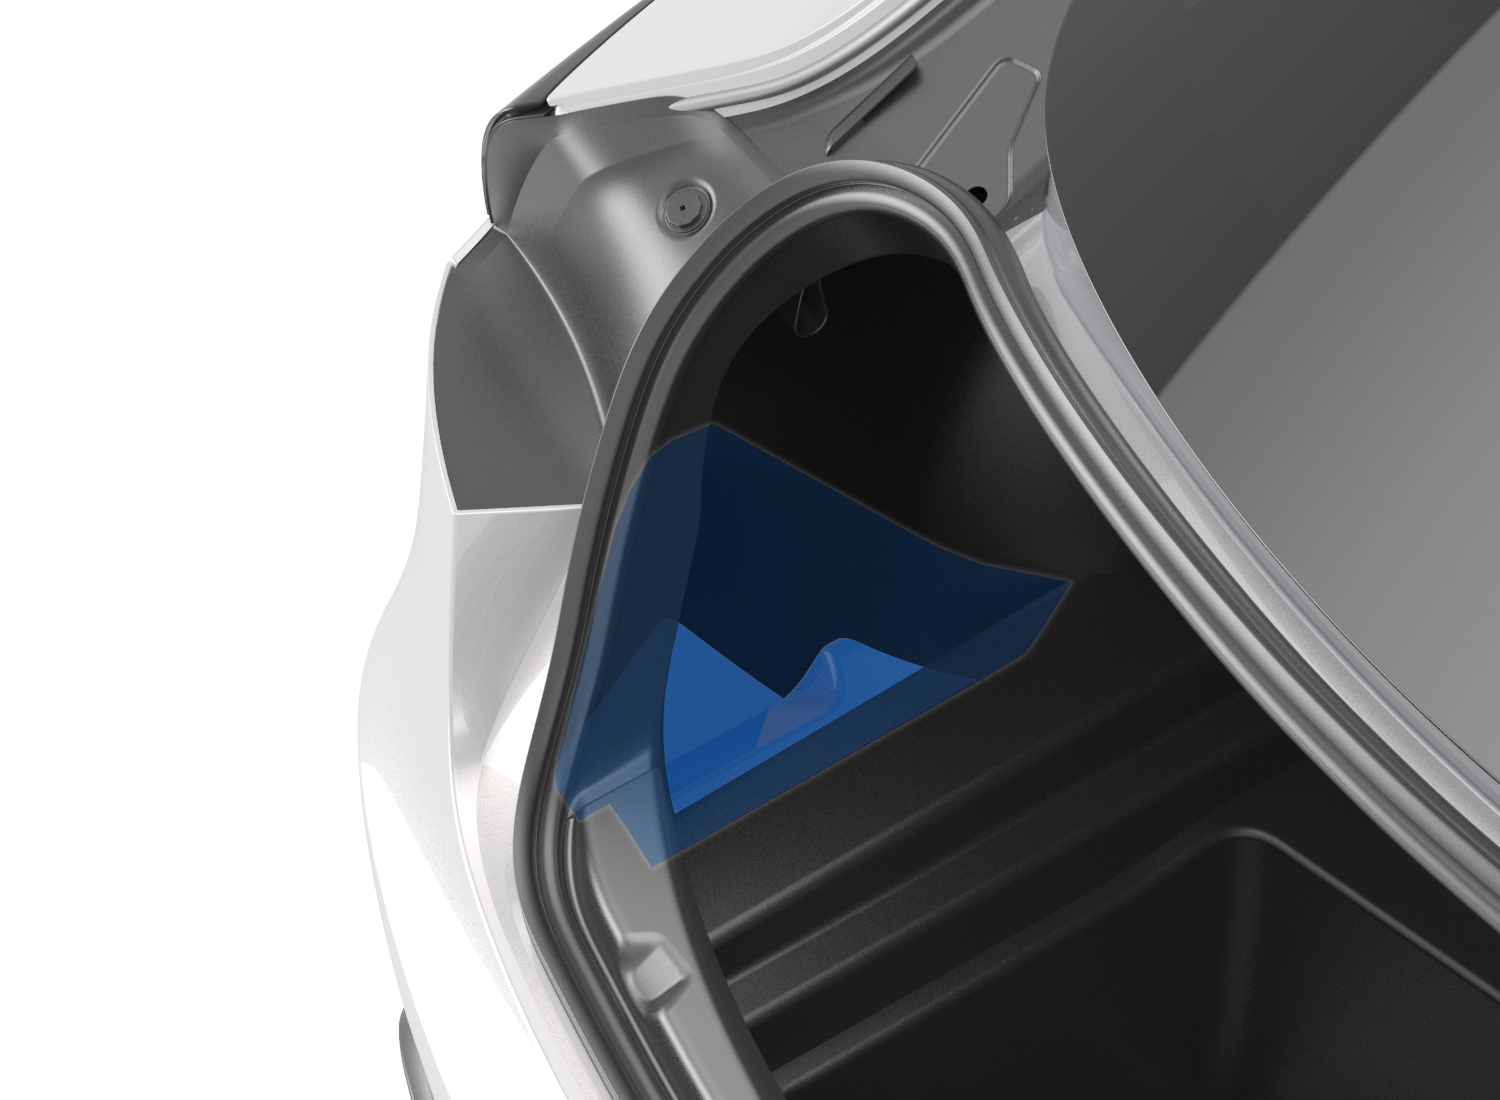
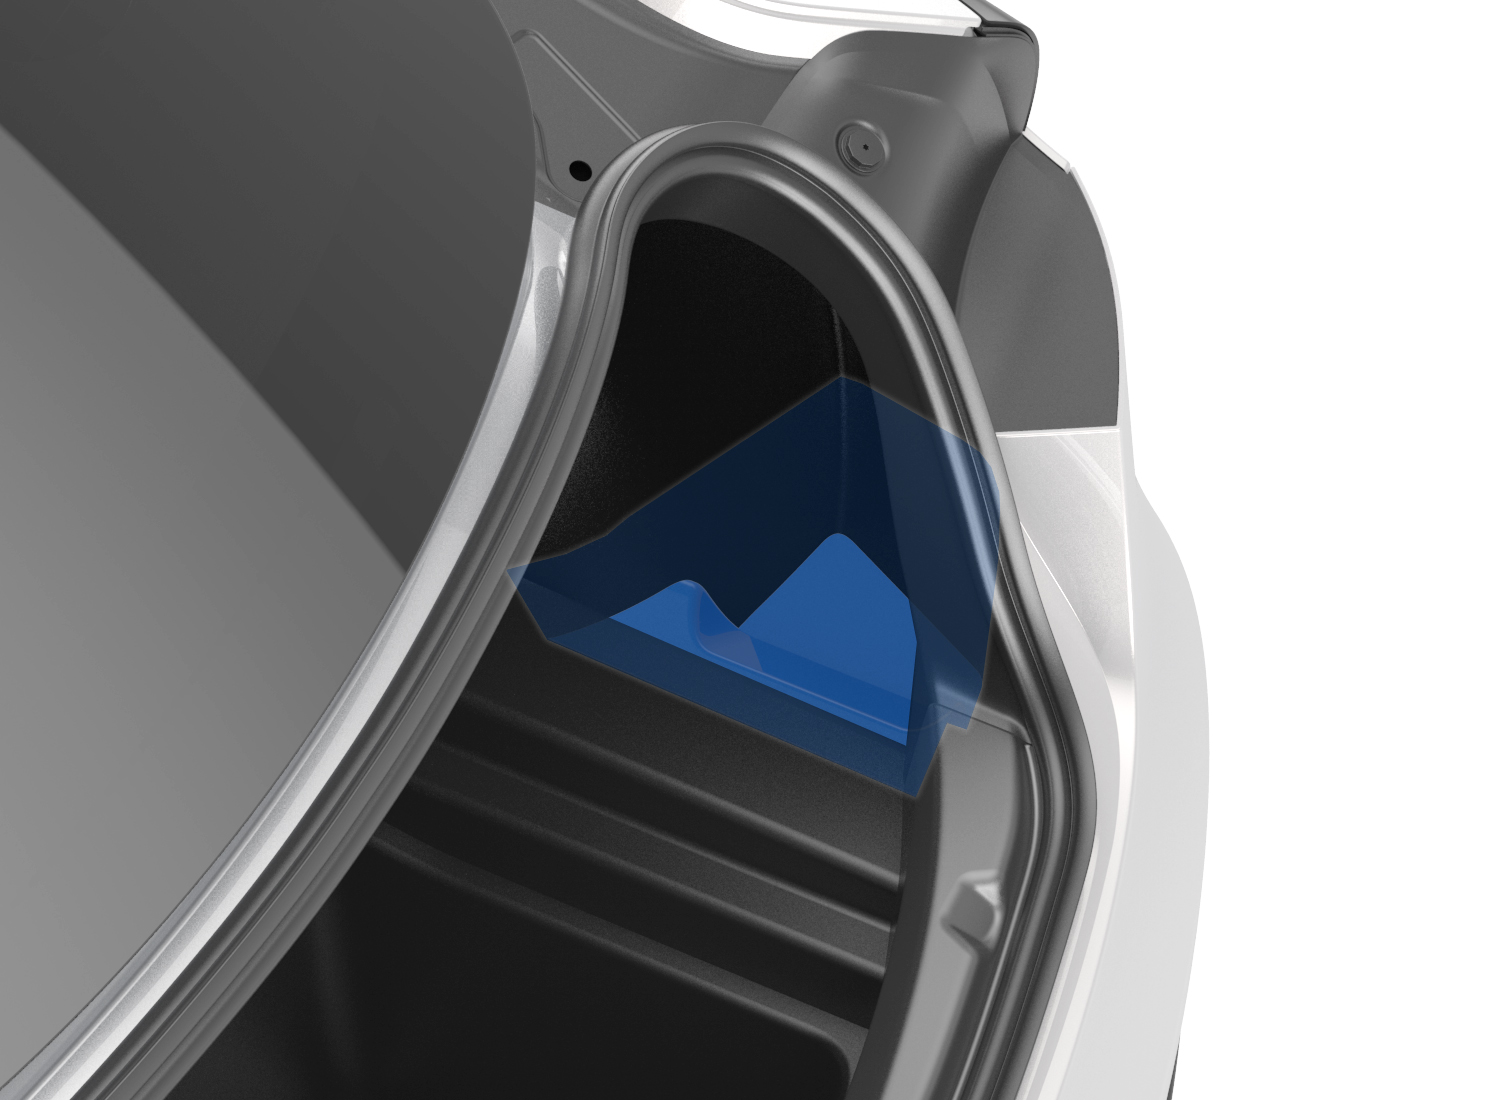
The trunk has storage in the main compartment, under the load floor, and in a compartment located on the driver’s side. Additional side storage compartments are on both left-hand and right-hand side.
 |
|---|
| Main Storage |
 |
|---|
| Left Side Storage |
 |
|---|
| Right Side Storage |
Note
For more information about how the Rear Trunk opening/closing mechanisms, see the Rear Trunk Theory of Operation.
Front Trunklink
There is a tow hook located underneath the front trunk mat cover.
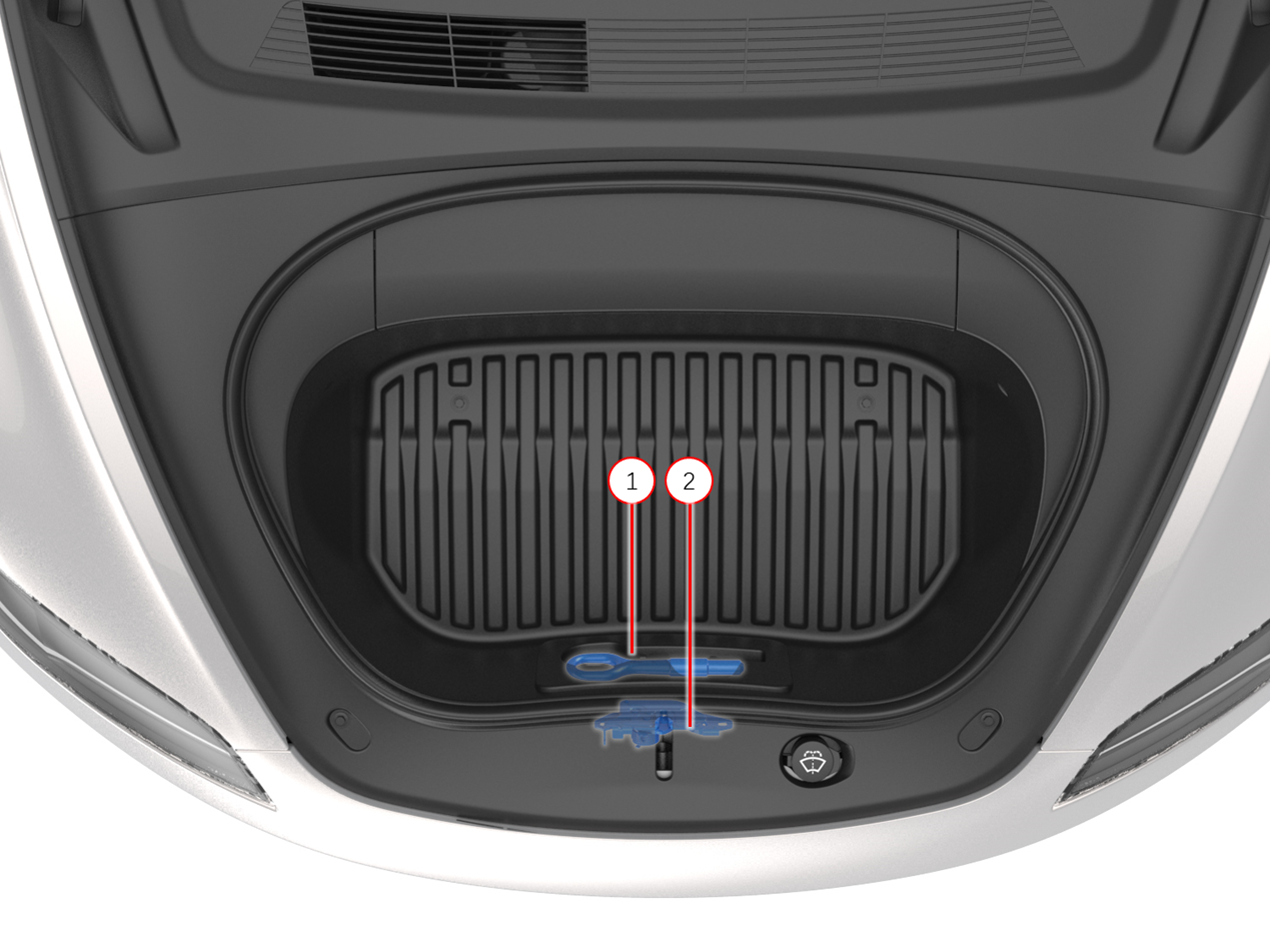 |
|---|
| 1. Tow hook 2. Latch area |
| Front Trunk Storage |
Storage compartments illuminate when they are opened, and turn off when closed.
Note
For more information about how the Front Trunk opening/closing mechanisms, see the Front Trunk Theory of Operation.
Headlinerlink
There is a press-laminated headliner on the 2024+ Model 3. Map lights are located in the front overhead module and the rear section of the headliner, illuminate when the light is touched, or when the doors open. A customer can disable map lights illuminating automatically from the touchscreen. The front and the new isolated second row headliner map lights are with capacitive touch activation.
The front overhead module on the Model 3 is located in the front section of the headliner, and it powers up the 2nd row map lights which are located in the rear section of the headliner. The left body controller provides power to the front overhead module. A hazard light button with capacitive sensing is located in the middle of the front overhead module. A physical gear selector which includes Park, Reverse, Neutral, and Drive (PRND) buttons are using the other four capacitive touch sensors. There are also two optical sensors for force sensing in addition to capacitance sensing.
Note
For more information about stalkless gear selection, see the Gear Selection Theory of Operation.
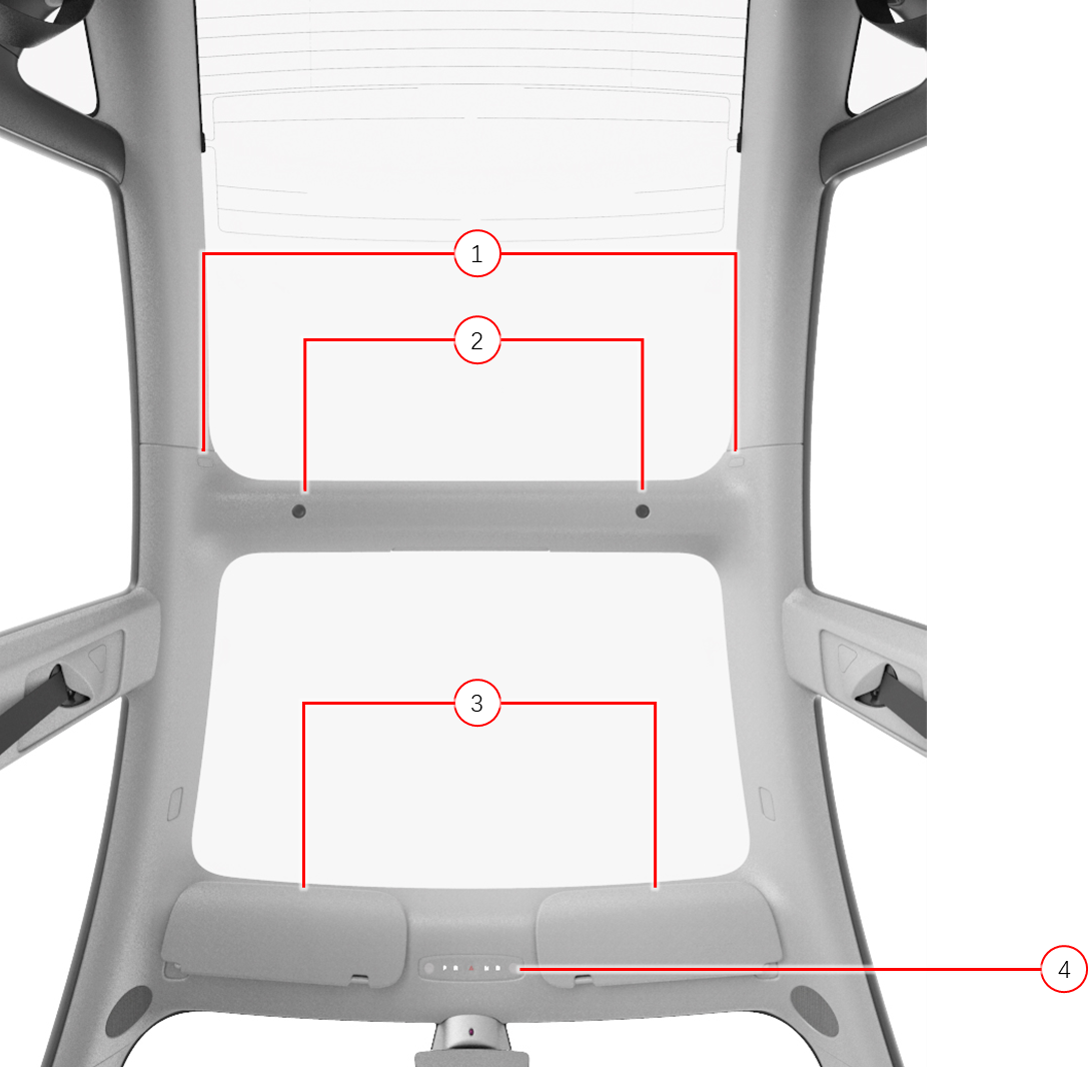 |
|---|
| 1. Coat hook (x2) 2. Second Row map light (x2) 3. Sun visor (x2) 4. Front Overhead Module (FOHM) |
| Headliner - Overview |
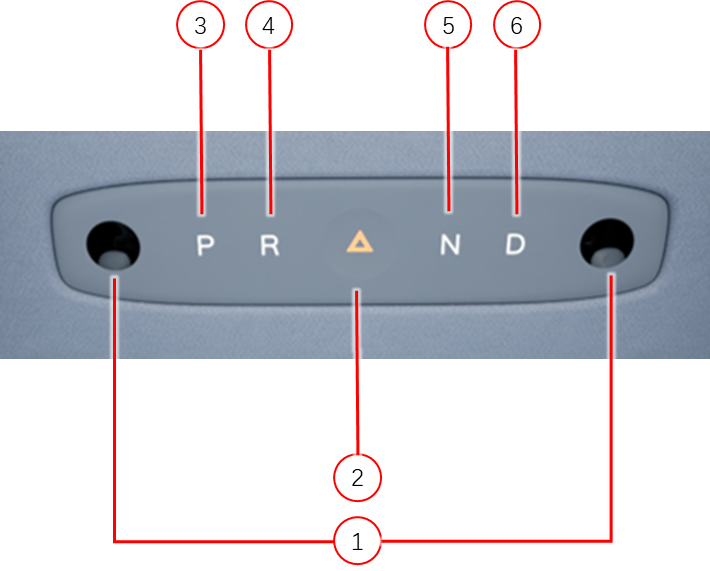 |
|---|
| 1. Map light (x2) 2. Hazard button 3. Park 4. Reverse 5. Neutral 6. Drive |
| Front Overhead Module |
Rear View Mirrorlink
The rear view mirror is has 3-layers that allows the mirror to "self-dim" for added driver comfort:
- The first layer of the mirror is a clear glass
- The second layer is an electrochromatic film
- The third layer is a mirror
The electrochromatic film activates when a small voltage is applied to it, which causes the amount of light passing through it to decrease (dimming).
Note
See the Exterior Theory of Operation for more information about mirror dimming.
Sun Visorslink
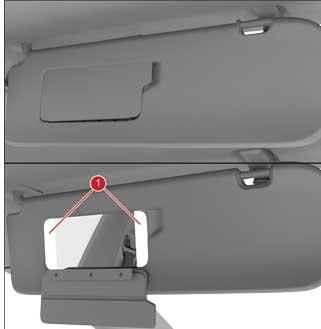
There are 2 sun visors installed to the front of the headliner. Each sun visor has a mirror cover. The mirror cover can be opened and folded down to reveal the mirror and two vanity lights.
 |
|---|
| 1. Vanity lights |
Sun Visor
|
Interior Lightinglink
Interior Lighting Overviewlink
The vehicle has the following interior lights:
- Front trunk
- Rear trunk
- Door – Map pocket
- Door – Puddle
- Door – Switch backlights
- Door - Interior Open Switch illumination
- Footwell – Front and rear
- Map lights (front dome lights) – Located in the overhead consoles
- Rear dome lights
- Sun visor vanity
- Glove box
- Center console – Front bin
- Center console – Rear bin
- RGB light module
Note
Map pocket light and footwell light are activated for all variants of 2024+ Model 3.
RGB Light Modulelink
A RGB Light Module is integrated into the door trim and instrument panel for all variants with the following two options:
- AWD: Hardware included for Instrument Panel, Front Doors and Rear Doors, with RGB selections.
- RWD: Hardware included for Instrument Panel, Front Doors and Rear Doors.
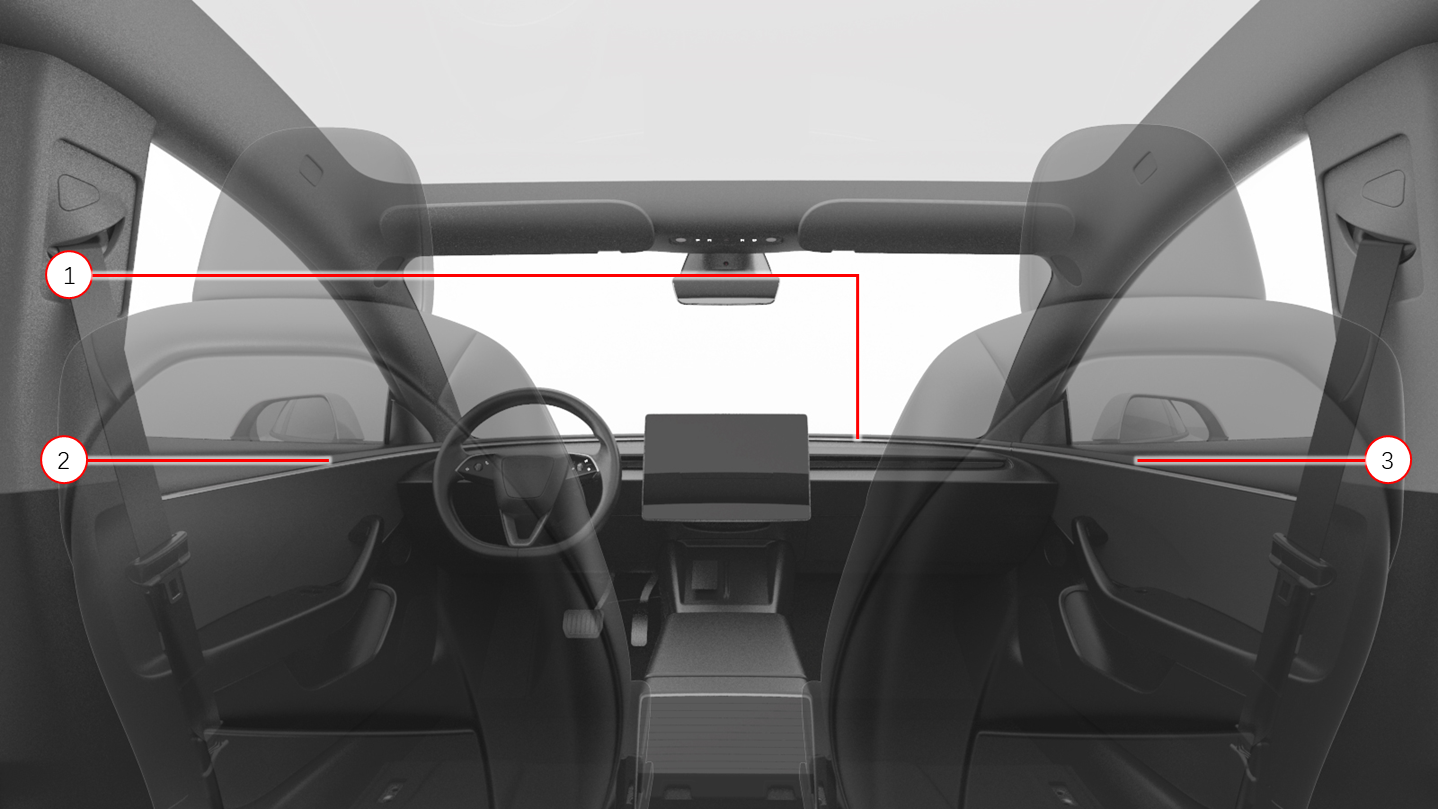 |
|---|
| 1. Instrument Panel light pipe 2. Front Left light pipe 3. Front Right light pipe |
| RGB Light - Front |
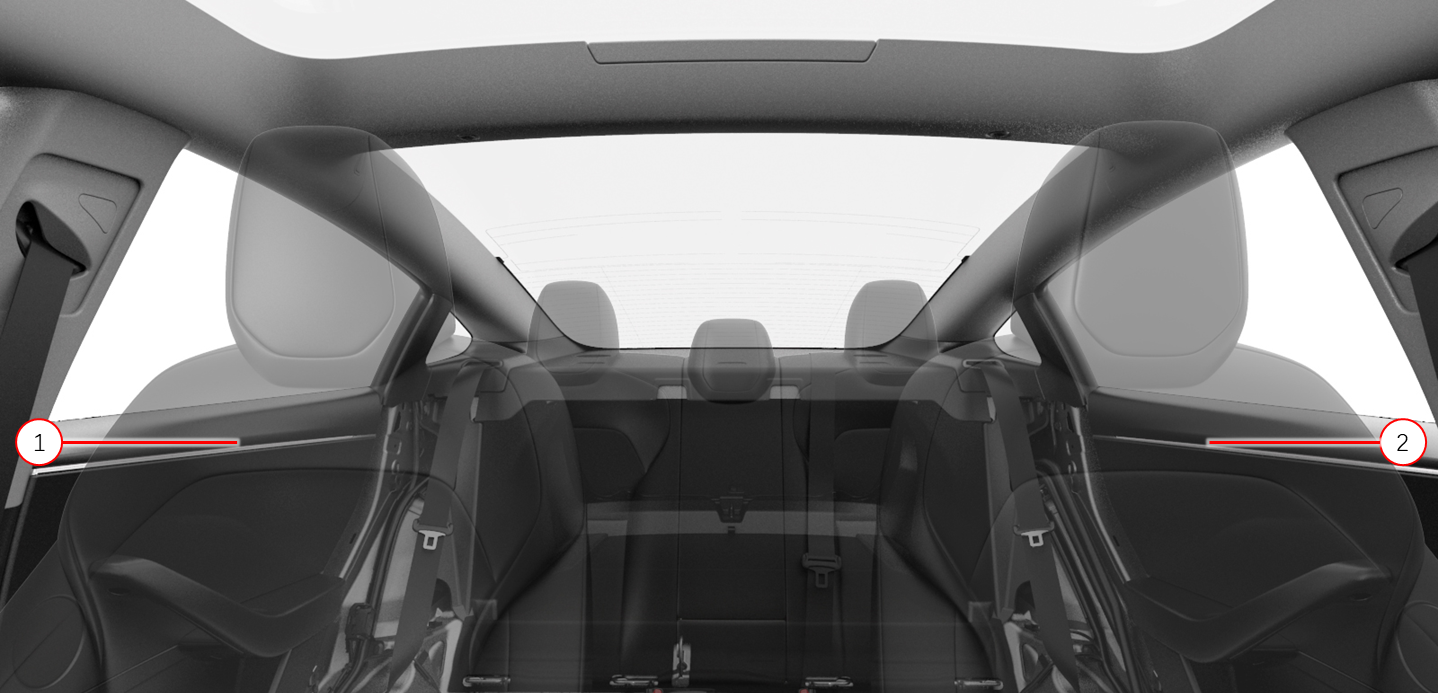 |
|---|
| 1. Rear Right light pipe 2. Rear Left light pipe |
| RGB Light - Rear |
The UI displays various light color options to adjust the RBG lights under Controls > Lights > Accent Lights. The RGB lights are controlled by the left and right vehicle controllers via LIN. The UI communicates with left and right vehicle controllers over the CAN bus.
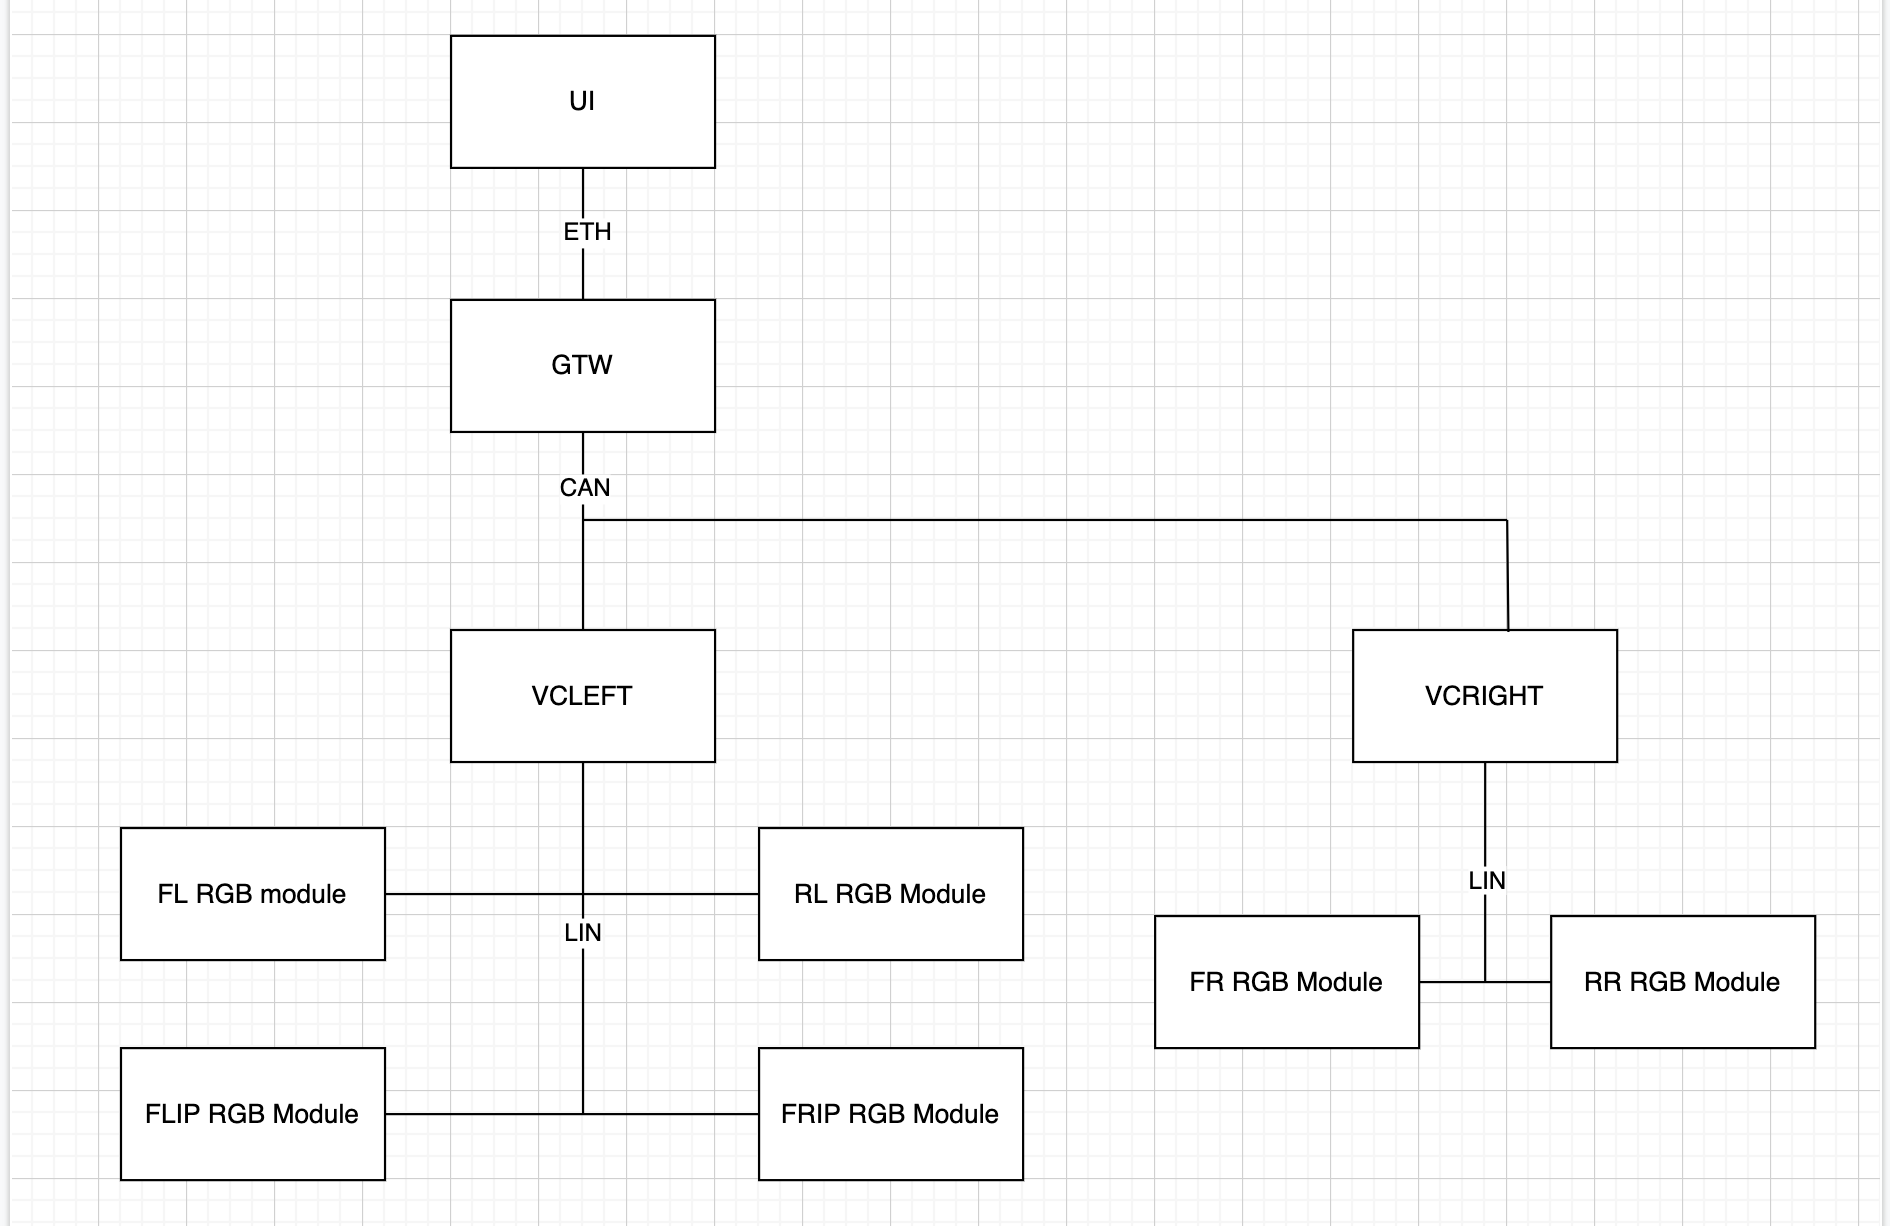 |
|---|
| Ambient Light Communication Architecture |
Instrument Panellink
Steering Wheellink
The steering wheel is made of a polyurethane (PUR) wrap and has the ability to be heated by utilizing a resistive pad underneath the PUR.
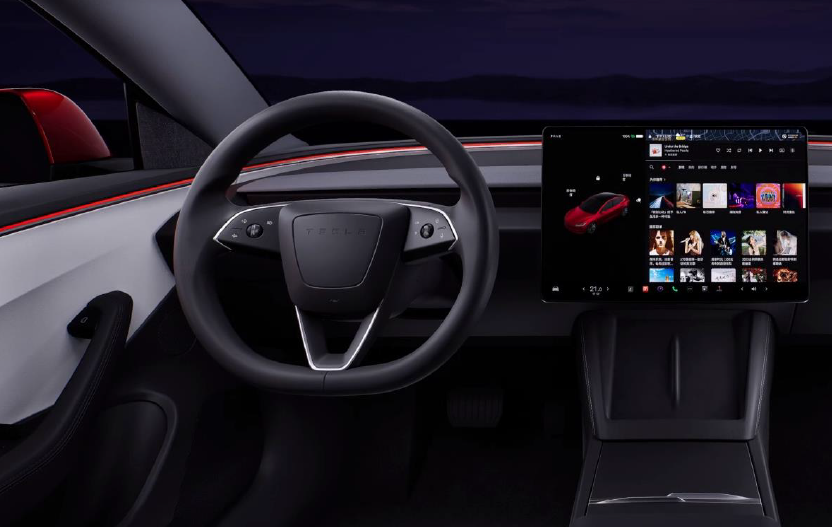 |
|---|
| Steering Wheel Overview |
Note
2024+ Model 3 is a stalkless vehicle, meaning it does not have stalks on behind the steering wheel to control gear selection, turn signals, or windshield wipers. These controls are now on the steering wheel or in the UI.
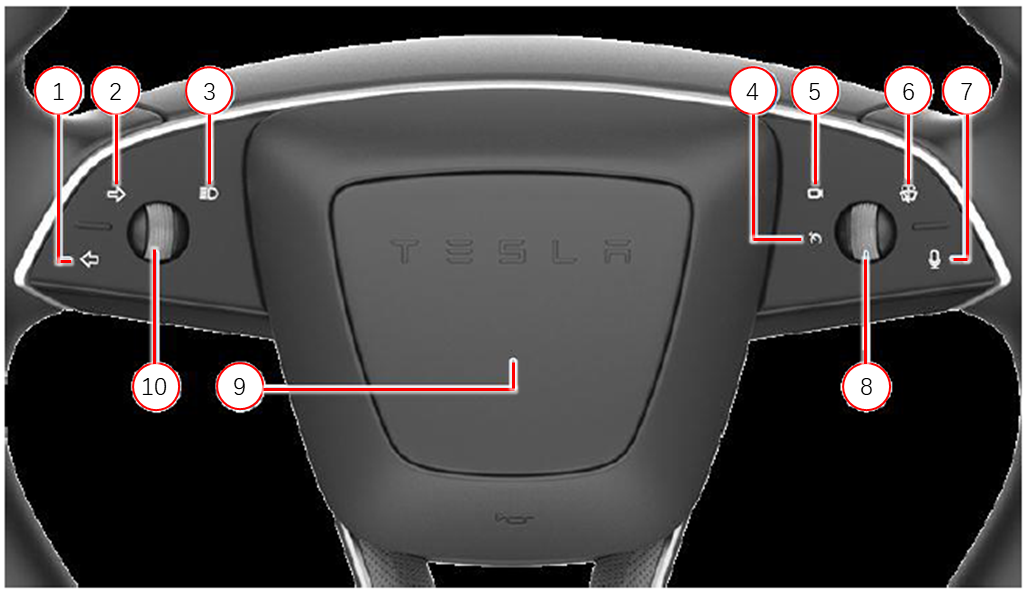
Switcheslink
The switches are located on both the left and right hand side of the wheel. These switches are both capacitive and force sensing. The capacitive portion indicates which of the controls is being selected. The force sensing is to ensure that switch has been actuated.
The left hand side has the turn signals and high beams. The right hand side has the wipers, camera and voice command. The center of the steering wheel can actuate the horn.
Scroll Wheelslink
The scroll wheels on the steering wheel can control the functions listed below:
- Cruise control adjustments
- Autopilot adjustments
- Steering wheel adjustments
- Mirror adjustments
- Volume
- Media controls (skip, play, and pause)
- User defined functions
 |
|---|
| 1. Left turn signal 2. Right turn signal 3. High beam 4. Cruise control (backlight only, the function is on the right scroll wheel) 5. Cameras 6. Wipers 7. Voice command 8. Right scroll wheel 9. Horn 10. Left scroll wheel |
| Steering Wheel Switches and Scroll Wheels |
 |
|---|
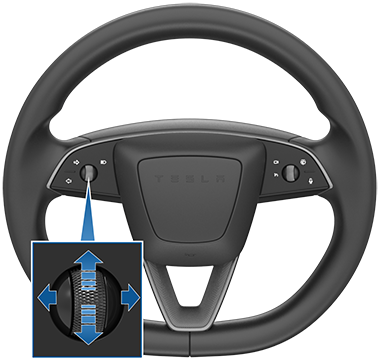
| Scroll Wheels |
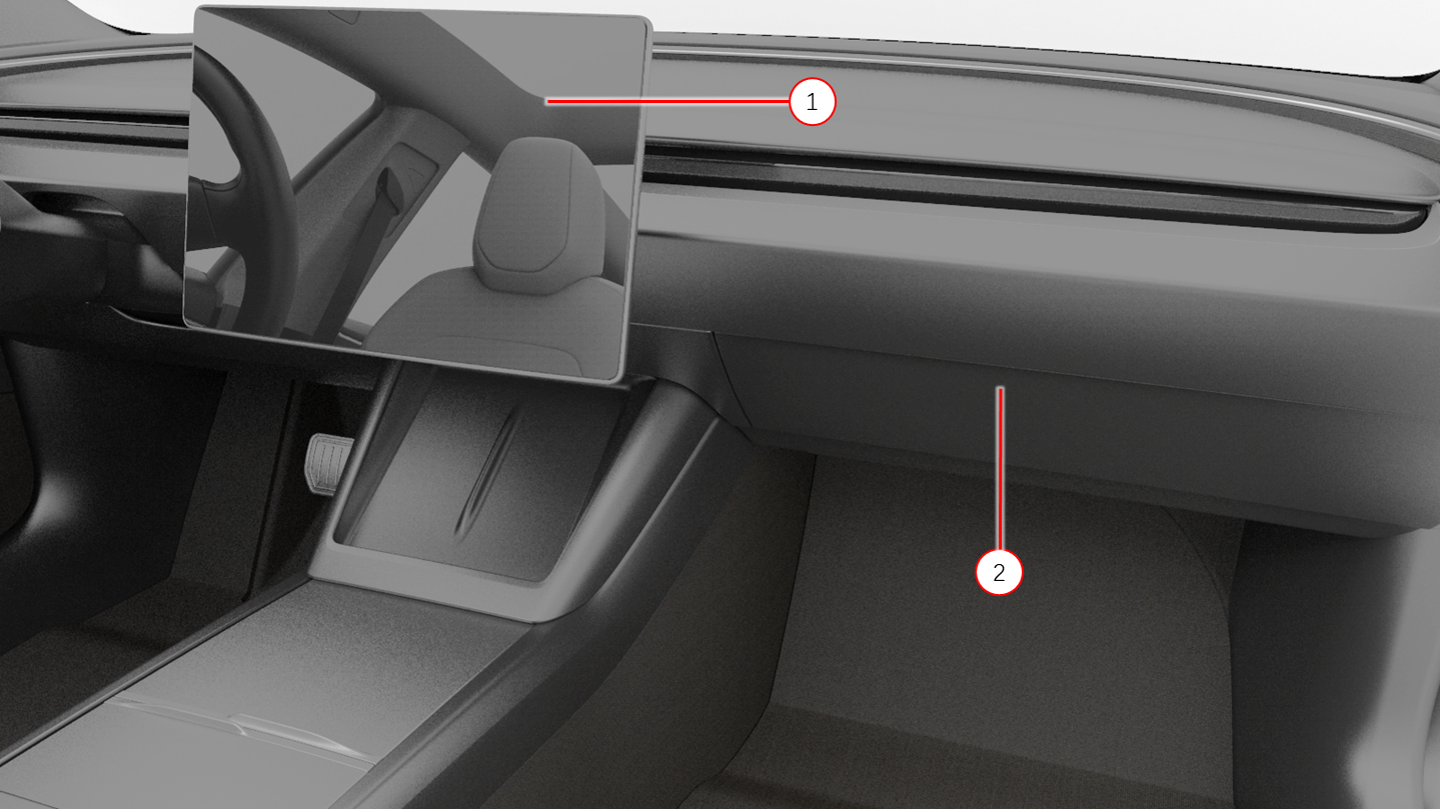
Glove Boxlink
The glove box has an electromagnet latch that box can only be opened from the UI. There are no physical buttons to open the glove box. To prevent damage, the glove box will stop functioning if the glove box door is cycled (opened/closed) ten times within one minute.
There is a USB-A 3.0 data-only ports in glove box for Sentry Mode recording locked storage, faster speeds for gaming, expandable USB storage, etc.
 |
|---|
| 1. Touchscreen 2. Glove Box |
| Glove Box |
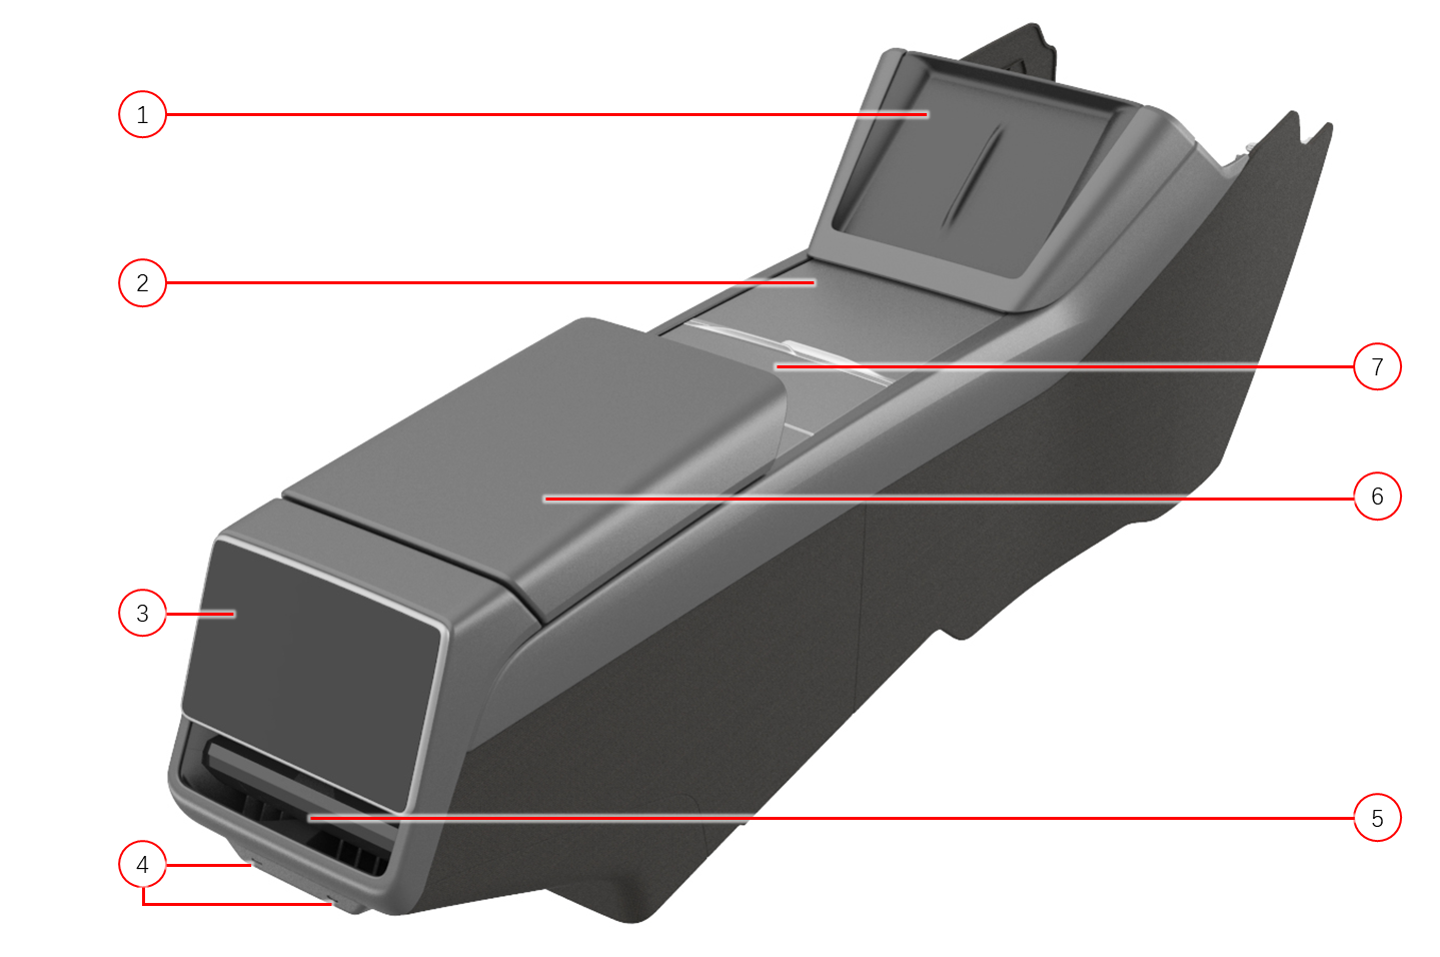
Center Consolelink
The center console is fitted with the following components:
- Inductive charging phone dock
- 3x USB-C ports
- Low voltage socket
- Lighting in the storage compartment
There is a low voltage port in the front storage compartment, and lighting in both storage compartments. The armrest is magnetic without mechanical latch parts.
The figures below show key information about the center console.
 |
|---|
| 1. Phone dock (with NFC for key cards and inductive charger) 2. Cover of the front storage bin 3. Rear display screen 4. USB-C port (2x) 5. Rear airwave vent 6. Armrest 7. Cupholder Cover |
| Center Console |
The front bin can be accessed by sliding the lid forward. The cup holder can be covered by another sliding lid.
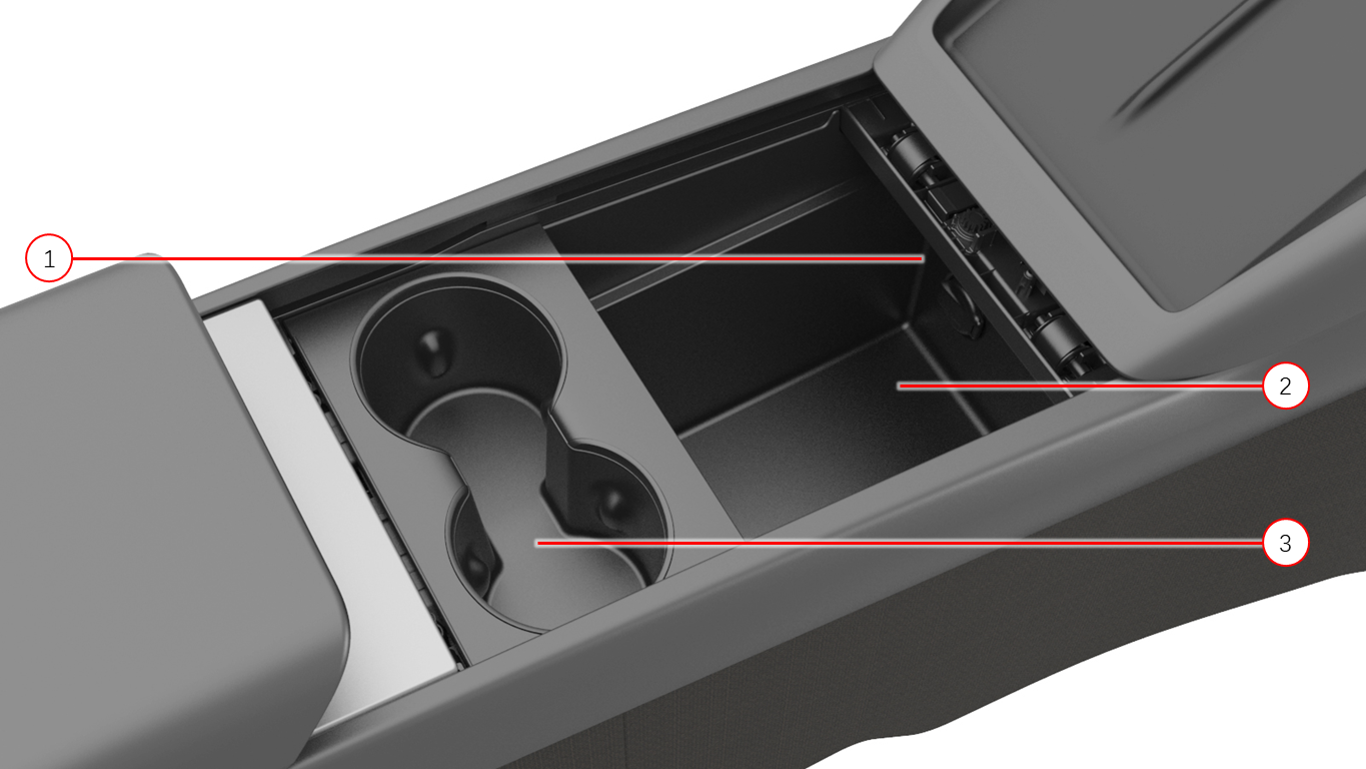 |
|---|
| 1. low voltage socket 2. Front storage bin 3. Cupholder |
| Center Console, Top view |
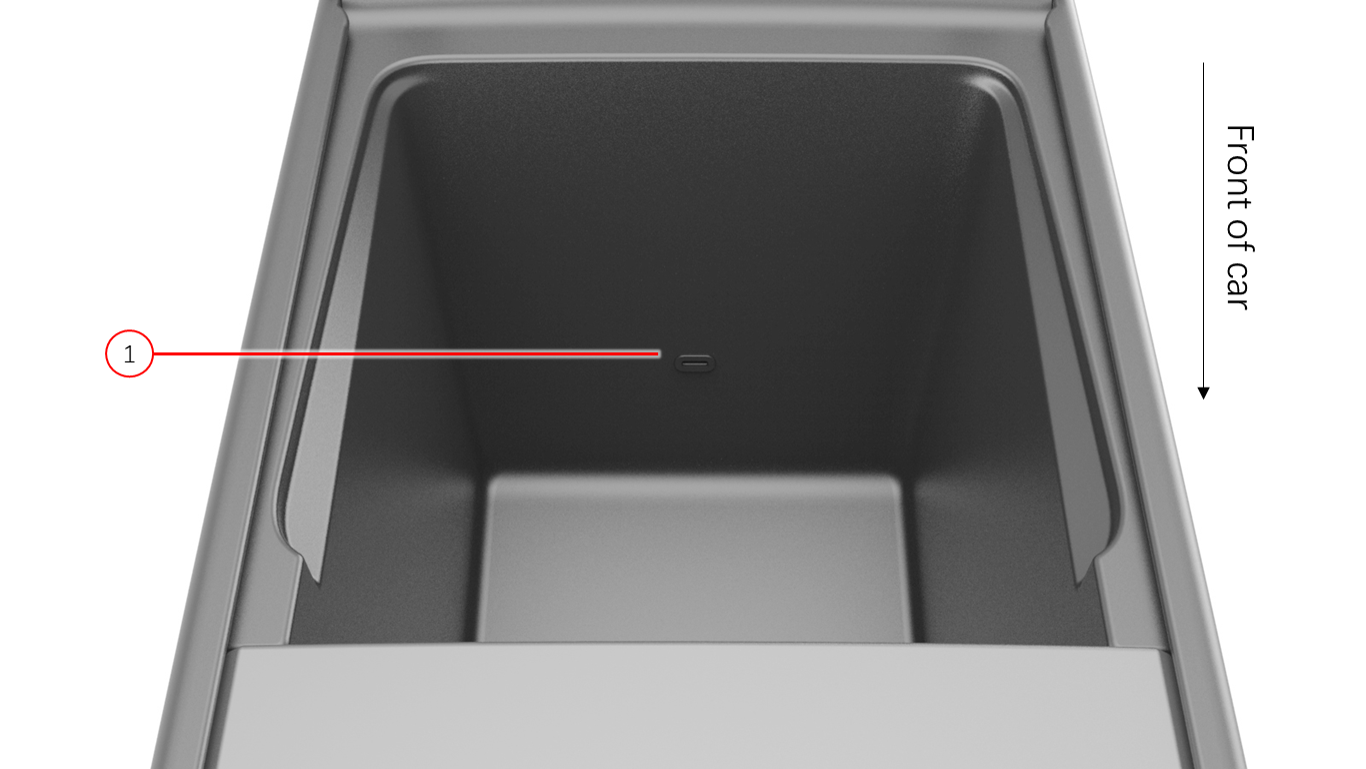 |
|---|
| 1. USB-C port |
| Armrest Compartment Bin |
Phone Docklink
The phone dock, located at the front of the center console, has space for two phones and provides inductive charging. Along with phone charging, both sides of the phone dock contains the Near Field Communication (NFC) key card reader to start the vehicle with the keycard.
 |
|---|
| Phone Dock |
Rear Display and Ventslink
The center console has a rear display which is intended for the rear passengers to direct the flow of the rear vents. Similar to the instrument panel (IP) vents, there are two actuators to control the left side vertical and lateral airwave, and two for the right side. Located beneath the rear vent are 2 USB-C charging ports (no data).
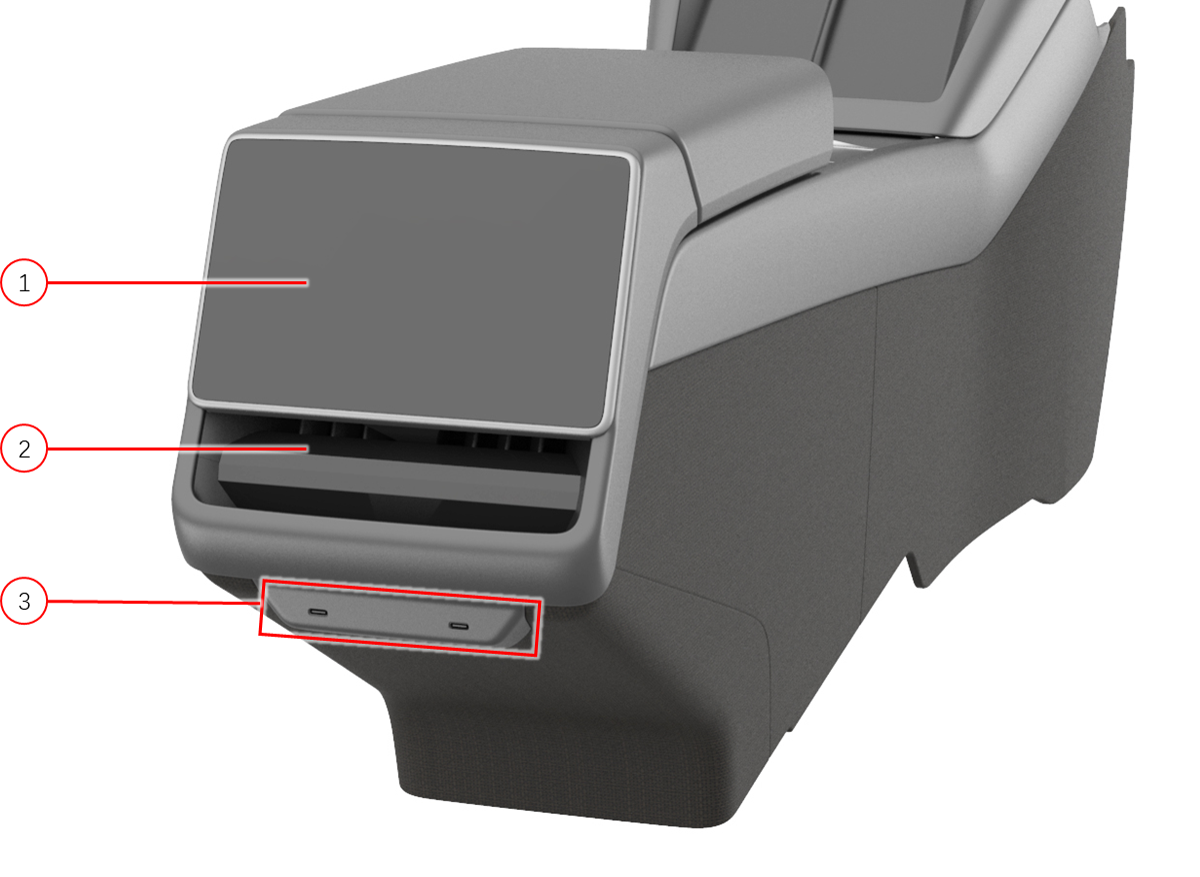 |
|---|
| 1. Rear display screen 2. Rear airwave vent 3. USB-C port (2x, no data) |
| Center Console, Rear view |